It’s the perfect time of year to learn about snowflakes!
One of the best ways to do this is to collect real snowflakes and use a magnifying glass or microscope to study them up close.
Here are some ideas to make the most of those snowy days.
If you do not have snow where you live, no problem. Just use the recipe below to make your own borax snowflakes.

Collect Snowflakes
When the snow starts falling, grab your coats and boots, a couple of pieces of black construction paper, and a magnifying glass or two if you have them.
As the snow is falling around you, catch a couple of snowflakes on your black construction paper and observe them with your magnifying glass, comparing how the snowflakes are similar and different.
Count how many sides or points the snowflakes have and if any snowflakes appear to match.
- Click through for another snowflake crystal project and more >>
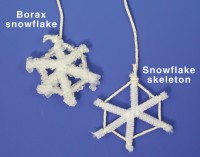
Make Borax Snowflakes
Make crystal snowflakes, stars, or candy canes using borax (look for it on the laundry detergent aisle at the store). Then you can use the real crystals as pretty decorations!
This activity takes about 30 minutes of active preparation and then overnight to set.
(Adult supervision recommended.)
What You Need:
- Wide-mouth jar
- Pipe cleaners
- String
- Scissors
- A pencil
- Water
- 1-cup measuring cup
- Tablespoon
- Borax
- Food coloring (optional)
- Glow-in-the-dark paint (optional)
- Ribbon (optional)
What You Do:
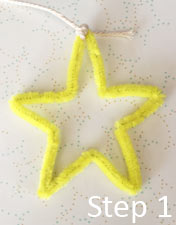
1. Twist pipe cleaners into whatever shape you’d like (we chose a simple star). Note: Make sure your pipe cleaner shape will fit easily into your jar with plenty of space around the mouth of the jar as the shape will be slightly wider once crystals have formed on it, making it harder to remove!
2. Tie a piece of string to one point of the shape. Tie the other end around the middle of a pencil.
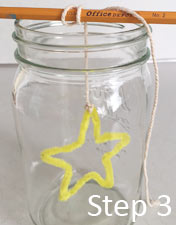
3. Hang the shape in the jar with the pencil resting across the mouth of the jar. Make sure that it hangs without touching any part of the jar. Take it out of the jar and set it aside.
4. Use a 1-cup measuring cup to count how many cups of water you need to fill your jar about 3/4 full. Then microwave the jar of water for 3-5 minutes or until it begins to boil. Have an adult carefully take the jar out using hot pads (the jar will be very hot!) and set it on a heat-safe surface.
5. For every cup of water you put in the jar, measure three tablespoons of borax. Stir the borax solution with a spoon until as much of it dissolves as is possible. If you don’t see any tiny pieces of borax floating around in the jar, add another tablespoon and stir. This will make a saturated solution.
6. Hang your pipe cleaner shape in the jar so that it is completely covered in the solution. Let it sit overnight. Gently remove your now crystal-covered shape in the morning and let it dry by setting it in a dry glass.
7. Optional: To make colored crystals, use colored pipe cleaners and add 5-10 drops of food coloring to the solution in step five. To make your snowflakes glow in the dark, paint the pipe cleaner shape with glow-in-the-dark paint in step one and let it dry completely before continuing. Once the crystals have dried, cut off the string and tie a ribbon to one point of your crystallized shape to make a Christmas tree ornament! These ornaments are fairly sturdy and make lovely Christmas gifts for friends, teachers, or family members.
What Happened:
 You made a saturated solution of borax, which is a chemical that forms crystals when the conditions are right.
By mixing it with hot water and letting it cool and having something for the borax (solute) molecules to attach to (the pipe cleaner shape), you gave the solution the right conditions to grow crystals!
Once the crystals started to grow on your shape, more and more crystals formed around them.
Ice crystals that real snowflakes are made of are not quite like these borax crystals, but they do look sort of similar and they both are pretty and sparkle when light shines on them.
Real ice crystals are made only of water. The difference is that they are formed when water vapor in clouds freezes and falls to the ground as snowflakes!
Frost is another form of ice crystals that you might see on windows and grass on cold mornings.
To learn more about snow and ice crystals, check out our Snow and Hail article.
Preserve Snowflakes
If you happen to have a microscope and microscope slides, try preserving snowflakes.
All you really need for this activity are the slides, but using a microscope is a fun bonus.
Prepare in advance by placing a couple of slides in the freezer so that they won’t melt the snowflakes.
You will also need hairspray or artists’ fixative. Keep these items in a cold area like your refrigerator or an unheated garage. When it is time to collect and preserve snowflakes, bring out the slides, the hairspray, and a couple of toothpicks.
Spray one side of the slides with the hairspray. Catch the snowflakes on the sticky side of the microscope slides, using a toothpick to gently move the snowflake to center it, if needed.
Place the slide with the snowflake in a cold area where no more snowflakes will fall on it, such as inside a covered box or in the unheated garage.
Leave the slide untouched for several hours so that the hairspray can dry and the water in the snowflake will disappear.
You now have the imprint of a snowflake on a slide you can study with the naked eye or a microscope.