Make a Tomato Battery
You can produce electricity with two metal strips and a tomato! Hear the electricity crackle using a pair of headphones. We used a ripe red tomato from a grocery store, although green tomatoes will work even better, as they are more acidic. This experiment is most impressive with metal electrodes, but many different kinds of metal will work. Try using a piece of copper wire (or a penny made before 1982), and a paper clip or galvanized nail. Although we suggest using alligator clip leads because they are easier to connect, any insulated copper or electrical wire will work well.
What You Need:
- Medium to large tomato
- Kitchen knife and cutting board
- 2 copper electrodes (or 4′ lengths of copper wire)
- 2 zinc electrodes (or large paper clips)
- 2 beakers or short glasses
- 4 alligator clip leads
- Headphones
What You Do:
1. Cut the tomato in slices, then cut each slice into smaller pieces. Put half the chopped tomato (including seeds and juice) in each beaker. Mash the tomato pieces with a spoon to make a pulpy mixture.
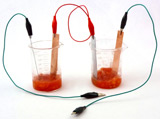
2. Insert a copper and zinc electrode into each beaker, making sure that they do not touch. You have now made two battery cells! Set one beaker aside for the moment.
3. In the remaining beaker, clip one wire lead to the zinc electrode and another to the copper electrode.
4. Hold the headphones near your ears, then touch the loose ends of the wire leads to the metal end of the headphone cord. If you look closely at the headphone plug, there will be several sections. Try touching the wires to different sections until you can hear the crackle of electricity that is being produced by your tomato battery cell.
What Happened:
 The noise you heard was caused by the flow of electricity through the wires. This electricity was created by the reaction of the tomato pulp and metal. The zinc reacts with the acid in the tomato, and tiny particles with a negative charge (electrons) are set loose into the tomato juice. These negative electrons are pulled toward the copper electrode, which has a positive charge. (In electricity, just as in magnetism, opposites attract). Every battery has a negative side and a positive side. In the tomato battery, the copper electrode is the positive terminal, and the zinc electrode is the negative terminal. The electric current runs from negative to positive, and back around again when connected in a complete circuit.
Experiment with different kinds of electrical circuits, and test the effect it has on the noise you can hear through the headphones:
1. To produce more power, connect two tomato battery cells together. With a wire lead connect one positive terminal (copper) to the negative terminal (zinc) on the other cell. Hook a wire lead onto each of the remaining terminals, then hold the two free ends of the leads up to touch the headphone plug.
2. Does the noise sound different now? Is it louder? Does the battery seem to have more power? This circuit is a series circuit (pictured above).
3. To build a parallel circuit with your homemade battery cells, hook the two positive (copper) terminals together with one lead and the two negative (zinc) terminals with another lead. Clip one end of the remaining leads onto each of the electrodes in one of the cells and run the free ends to the headphones.
Voltage measures the force of electrons moving through a circuit, while amperage measures the amount of current (the number of electrons flowing through). In a series circuit, the voltage is doubled, but the amperage stays the same as with just one battery cell. In a parallel circuit, the amperage is doubled, but the voltage is the same as with one cell. Which kind of circuit you use depends on what balance of voltage and amperage you need.
If you want to take an accurate measure of the power in volts and amps that your tomato battery is able to produce, use a digital multimeter. You can also try powering other small electronic devices with your tomato battery! You’ll need to make three or four battery cells, and connect them in a complete circuit (try both series and parallel). You can power a small light bulb or a buzzer this way. You can also experiment with other homemade batteries – use salt water, vinegar, or a potato.
Science Project Video – Tomato Battery
- For more fun project ideas, see our Science Project Videos page.
| Featured Kit! Enviro-Battery Kit 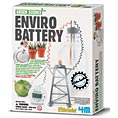 With this kit you can make a battery from a potato, lemon, water, coins, or even a cup of dirt or a potted plant! Experiments in this Green Science Kit include making a potato-powered clock, a lemon-powered LED bulb, and a soil-powered sound chip (it sings like a bird!). An LED, sound chip, and digital watch are included to use with your homemade batteries. With this kit you can make a battery from a potato, lemon, water, coins, or even a cup of dirt or a potted plant! Experiments in this Green Science Kit include making a potato-powered clock, a lemon-powered LED bulb, and a soil-powered sound chip (it sings like a bird!). An LED, sound chip, and digital watch are included to use with your homemade batteries. |
Electricity Quiz Game
Build your own electronic board to test your friends, and see how much they know about batteries and electricity! When a question is answered correctly, a light bulb will instantly turn on. You can download our game board with questions about batteries, or come up with your own quiz about any topic you like.
What You Need:
- PDF download of game board
- Cardstock
- 10 paper clips
- 2 nails
- Scissors
- Tape
- Insulated copper wire
- 1.5 volt battery (size AA or D works well)
- Battery holder
- 1.5 volt bulb
- Bulb socket
What You Do:
1. Print out the game board on a piece of card stock.
2. Beside each question, clip a paper clip onto the card. Do the same beside each answer.
3. Turn the card over. Cut five lengths of copper wire that are long enough to reach across the card.
4. Strip the insulation off each end of wire, taking off about one inch of coating. Hold a pair of scissors in one hand, then clamp the wire between the scissor blades and gently rotate the wire until the coating has been scored all around. Pull the coating free from the wire, leaving the copper ends exposed.
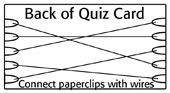 5. Wire the board as shown to the right, creating five pairs of paper clips connected together with wire. Try sticking the bare wire end under the paper clip, or twisting it around so it stays in place.
6. Using several pieces of tape, secure the wire pieces to the back of the card.
7. Cut three more lengths of wire about 6 inches long, and strip the ends.
8. Connect wire #1 to a nail by wrapping the end securely around the nail several times, then connect the other end to the positive terminal of the battery. (If you don’t have a battery holder, use a piece of electrical or masking tape to hold the wire in place).
9. Connect wire #2 from the negative terminal of the battery to one side of the bulb socket (with bulb screwed in).
10. Connect wire #3 to the other side of the bulb socket. Attach the free end to another nail.
11. Your quiz game is ready to play! Touch one nail to the paper clip next to a question and the other to the paper clip by an answer. If it’s the correct answer, the light bulb will light up!
What Happened:
When you touched the nails to the paired paper clips, electricity was able to flow from the battery to the light bulb. Since the nails and paperclips are made of metal that conducts electricity, a complete circuit was made, with electrons flowing continuously from negative to positive. If the answer you chose is incorrect, the electrical circuit is not complete, so the light bulb will not shine.